

Sheltering Your Troops and Commander
There is nothing worse then coming in to the game all ready to begin more builds then finding out you have been HIT!
In this article I will talk about some of the reasons you will want to shelter your troops and some tips on how to remember to shelter your troops and commanders.
The Shelter is located right below the castle and to the right of the stairs leading up to the castle area. When you started the game they gave you a quest to do, the quest showed you the shelter, but lets face it many times we are rushing to get through the beginning quests and forget about a lot of what was said.
When there is no one in your shelter the game has given you a hint by putting "ZZZZ" over the head of it, this is a big tip if you are leaving for the night and seeing the "ZZZZ" you do not have your troops or your commander in the shelter.
By clicking on the shelter you will open to the following picture. I made this large so you can see what we will be talking about.
Right away you will have the list of your troops on the left hand side followed by an Auto-Select button in green. On the right you will see your head commander and amounts of time. Followed by a confirm button in gold.

First we will talk about the troops that you will shelter. When you are lower hopefully you will be gaining more space as you up your castle. With each level your shelter climbs with the castle. The amount of troops they list that you can send out can be housed within the shelter.
But there are a few things that you can do to increase that. You most likely already know that if you add your commander and do some research you can up the amount you are able to take into your shelter.
But there are a few things that you can do to increase that. You most likely already know that if you add your commander and do some research you can up the amount you are able to take into your shelter.

First, lets look at the commander page. You will notice a number beneath each of the commanders. That number is the amount of troops that particular commander can take in with them when you shelter your troops with the commander. That amount changes when you promote your commanders. So in this case you can take 1,800 more.

Later when you are high enough you will unlock the Commandership tab in the Research tower.
If you look you will see that you will be given a "Shelter Capacity" research to add more troops to your shelter.
Every little bit helps in protecting your troops. But lets take a look again at our shelter page.
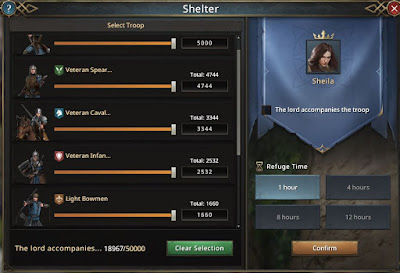
If you look at the bottom of the left side it will tell you how many troops you can hold. You have two options on how you put the troops in. If you have more space then you have troops you can let the program auto select the troops as they did on this page.
The Clear Selection and Auto Select button are the same button, once you click it, you will see the opposite words on it. If you have too many troops you will want to save your higher troops and gradually get rid of the ones that do not fit in the shelter.
Many people make the mistake on trying to keep both. But there are issues with that. You having lower troops while having higher troops can run into the problem of not having bed room, in the hospital, if you get hit.
Remember the lower your troops are the easier they are to kill, so they generally die first in battles. If they end up in your hospital, they take taking up space and if you haven't built hospital beds your higher troops will die.
Plus do you really want to waste your resources in healing them. I would suggest that the easiest way to get rid of the overage is just simply dismiss them.
Another reason for dismissing the troops is that using a mixture of troops can cause a battle to be lost. The battles in this game are about Morality. When a troop dies, it brings down the morality of the remaining troops. When morality hits "0" you lost. So see once your building higher troops there is no real purpose of keeping them.
Dismissing them is done in the Barracks, as you click on the type of troops you want to dismiss in the lower left corner is a minus sign ( - ), clicking on it will allow you to pick how many of that type of troop you want to dismiss. So just put away in the shelter what you want to keep, and dismiss the ones that don't fit in.

Now remember we said that when you add your commander you can take more, if you look at the previous picture it stated 500,000 and the commander currently can take 1,800 with him, by clicking on the box beneath the Commander this number changes to reflect the total of 518,000.
After putting the troops in and the commander you need to decide a refuge time. I ALWAYS pick 12 hours. This is just in case you are unable to make it in. Plus getting into a habit is important and this way when you go to bed they will be still there when you wake up, unless your sleep longer.
TIP 1: Always put your troops in and commander in the shelter, even if you are bubbling, so that you get into the habit of locking them away.
TIP 2: If you have overage of troops and they are higher ones, ask an alliance mate who is bubbled if your overage can spend the time your away in their embassy.
If this is going to be a every day thing. Split the cost of the bubbling, by just buying the protection truce and sharing it with them. No matter how big or small everyone is trying to save blue diamonds.
TIP 3: Make sure you have a protector. To cover your castle if you are not around. Also make sure you help someone else and become their protector.
In closing these troops are what you need to become a part of this war game. Protecting them is very important. You don't want to have to keep rebuilding them each day when just a click a way they would all be safe.
Slow down, don't play to late and be in a rush when you leave. Always log out on the castle view and Look for the "ZZZZ's". Remember to put them away, make a note if you have to.
As always have a great time building!


